Log in to join the conversation.
Ada's Dream Organiser
Please support Bimblybob by Liking/Boosting their Print on Printables.
This is working now. Thanks to @Txang_79309 for the test prints and photos.
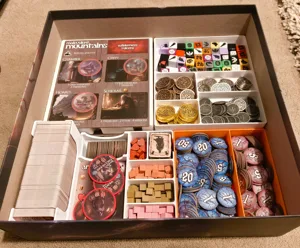
This is a simple insert to organise Ada's Dream including the Exhibition expansion. I couldn't find any other inserts for this game (that were free) so decided to make my own.
You will have to store the solo reward tiles (double layer) and solo assignment tracks (single layer) in the bottom of the box in a uniform layer. The provided photo shows how I arranged it prior to modelling the rest. I arranged the four solo assignment tracks into two stacks; creating a stable platform for the rest of the print. The remaining boards and manuals all rest on top of the print. The files are named to help you organise the remaining bits into their relevant boxes. Hopefully it's fairly straightforward.
The player boxes (print four of these, one of everything else) holds all the starting resources and markers for each player underneath their starting cards (each player box should store 4 money, 1 coal, 1 brass, 1 book, 1 steam marker, 1 innovation marker, 4 research tokens, 2 minus gears, 1 multiply gear, 1 travel token and 12 player discs).
SLEEVED OPTION - I have added a sleeved option which drastically thins out the bottom layers of the money tray and large_card tray alongside increasing the card tray depth to allow for a 30.4mm stack of large cards in the tray. If your sleeved stack fits that then go for it...The money may need a bit more massage to fit in their tray but should still work. You will need to print the two files with the -sleeved suffix to replace the original files. I have updated the player tray as well but have replaced the original with the sleeved variant as it fits regular cards a bit nicer too.
The reference_&_setup part holds the 16 science scoring tokens, 16 assignment scoring tokens, 9 breakthrough tokens, 15 university tiles, as well as the score pad, first player token all in dedicated storage bins. The large player aids rest on top to act as a 'lid'.
Hopefully you can make sense of the arrangement from the CAD screenshots. I have included a zip of all the step files in case you feel inclined to remix it...
UPDATE- played with the insert and it makes sense to swap the cogs and books from the original so that the addition cogs and books are separated in the same tray and the multiply cogs are in their own tray. Other than that it worked great. I'm very happy with it.
Here is an untested insert I designed. My printer is currently broken but it should fit everything including the expansion into the box with no(?) lid lift... I will print it soon...