Log in to join the conversation.
Mansions of Madness Player Dashboard (Basic Version)
Please support KittieKats by Liking/Boosting their Print on Printables.
This is the basic version of my Mansions of Madness player dashboard. I also created an ornate version with tentacle embellishments that can be found here .
I loved the idea of printing some player dashboards for Mansions of Madness (2nd Ed.), but I couldn't find any designs for sleeved cards that address the "dual-sided" flip mechanic of the damage, horror, and spell cards. So, I designed my own.
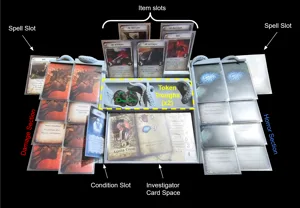
The dashboard comprises 3 parts (left side, right side, and center) to accommodate smaller print beds and storage. It is designed for sleeved cards, though I imagine it would work just as well for un-sleeved cards. As shown in the images, the dashboard features an investigator card space, 3 rows for items, two token troughs, a condition slot, 8 damage slots (because a 9th damage usually means wounding/death for the investigator(s) with the highest health), 8 horror slots (same reasoning as the damage slots), and two spell slots (top right and left corners).
A quick note: My design goals were to make the dashboard work with the game's "card-flipping" mechanics and facilitate the way my friends and I like to play. Thus, it's designed more for function than for compactness. It is not excessively large, but you may consider other options if you have a very limited play area. If I can find the time, I will design a version that clamps to the edge of a table.
Please note the following settings/parameters are recommended and verified for PLA on the Prusa MK4S. If you are using a different printer or filament, you may need to scale the prints or adjust settings to fit your needs. ** I highly recommend testing and dialing in your print settings using the provided "Joint Fit Test.stl" file before printing the full pieces. ** That way you can ensure you will get the desired snug fit between pieces without wasting time and filament. Any slicer tips given below are for PrusaSlicer, though you may have to be in advanced or expert mode to access some settings.
• PLA is recommended (I used Hatchbox light gray matte PLA), but I imagine PetG will work as well.
• 0.4 mm
• 0.15 mm - 0.2 mm
• If using PrusaSlicer, the “0.15mm SPEED” or “0.20mm SPEED” presets are good starting points.
• None (The basic version is designed to be printed without supports)
A brim is recommended on the "Center" piece to to mitigate shrinking in the corners. Alternatively, you can add your own “mouse ears” to the corners of the center piece (plenty of tutorials online of how to do this).
• Brim type: Outer brim only
• Brim Width: 10 mm
• Brim separation: 0.1 mm
For PrusaSlicer users: If you are printing all pieces (Left side, Right side, and center) in the same batch, you can add a brim to only the center piece by right clicking the center piece and selecting “Add settings”>"skirt and brim". Then ensure the “Brim Width” box is checked and hit “OK”. From there you can edit the brim width on the right side of the screen under “Object Settings to modify” .
• I found the default 15% “Grid” infill to be more than adequate, but you can play around with this to find a density and pattern that please you
The parts are designed to be printed without supports in the orientation in which they appear below.
•
Important: If you are using a bed-slinger (like the MK4s), ensure you have the longer dimension of the side pieces in-line with the axis in which the bed moves (see image below).
•
•
/pic1473795.jpg)
/pic2774395.jpg)
/pic1324689.jpg)
/pic1460477.jpg)
/pic1167590.jpg)
/pic1097393.jpg)
/pic1055726.jpg)
/pic1144308.jpg)