Log in to join the conversation.
Tiletum
Please support Mrakomor by Liking/Boosting their Print on Printables.
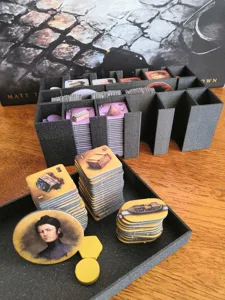
This organizer allows you to sort all Tiletum components and to separate the three and four player tiles for a quick board setup. The solution does not increase the size of the box (does not raise the box cover).
The print does not require any glue to complete. Print without supports. I used default setup for PLA in PrusaSlicer except for infill, that I decreased to 10%.
Every file needs to be printed once except for PlayerBox. You will need to print it four times, ideally in the colours of the player pieces (green, blue, orange and violet).
First of all place the main board to bottom of the box and put the four player boards to one side of the box. This creates two levels, where to put the boxes. You will place Cities and Resources (on top of one another) and all the square tiles ( character , contract and bonus tiles) directly on top of the game board (lower level).
Place all the player boxes (side by side) and cathedrals (place on top of the player boxes) on the player boards (higher level). The dice/card organizer goes on top of the player boards by the player boxes.
Place rulebooks on top of the boxes. If you placed all the items correctly to the game box, the rulebooks will be exactly at the top of the box and they will not be raised above the box in any place.
• gold
• food
• wool
• stone
• iron
• action point counters
Resources are organized to two boxes, where ResourcesTop serves as both the organizer and the cover for the ResourcesBottom box. The top part gets closed using ResourcesLid. You can distribute the two boxes on the table so players on the other side of the table can easily reach common resources.
Place the boxes directly on top of the game board.
• action wheel
• action tiles
• compas rose marker
• town tiles
• fair tiles
• fair order tiles
• corruption tokens
Action wheel must go to bottom of this box.
Place on top of Resources box.
• contract tiles (bottom level)
• bonus tiles (middle level)
• character tiles (top level)
Contract tiles, bonus tiles and character tiles are organized to three boxes, that fit into one another. On each level the common tiles go to the big part and 3+ and 4 player tiles should go to the dedicated square holes.
If you play the game solo/two player, you can keep the 3+ and 4 player tiles separated in the four side holes. If you aim for higher player count, just throw the more-player tiles to the big area and mix them with the common tiles.
Place directly on top of the game board.
• pillars
• merchant meeple
• architect meeple
• 3 generic markers
• houses
• +100/+200 victory point marker
• bonus action point markers
Each player has its own player box with the pieces (above) of his/her colour. Place the player boxes side by side on top of the player board.
• dice
• cards for the solo play
This part consists of three parts. The biggest one will hold (possibly sleeved) solo cards. Put the medium part into this and place the dice into it. You will close this box using the cover.
Dice/card organizer should be put on top of the player boards by the player boxes.
• cathedral tiles
• construction cost tiles
Place the sorted cathedral tiles to their holes. The column of holes on the opposite side of the box to the construction cost tiles is a bit bigger than the two other columns. So place the biggest cathedrals there.
Place this box on top of the player boxes.
Remix from: Small tray for organizing just the cathedrals and construction cost tiles. I did not want to print a full-size organizer, because I use cloth bags to organize tiles that need to be randomized in most of my games. The original organizer's lid wasn't designed to stay shut when using the tray in isolation, hence my remix.
/pic8573832.jpg)
/pic8956832.jpg)