Log in to join the conversation.
burncycle Insert / Organizer - Holds All Expansions and Both Sets of Brassmags
Please support js500 by Liking/Boosting their Print on Printables.
This is an insert / organizer for burncycle, all of its released expansions (as of December 2023), and the Brassmag Volumes 1 and 2. It all fits in the core box, has no lid lift, supports vertical storage, and was designed to aid setup and teardown. A big thanks to Hextra for doing lots of test prints to verify that all the trays print as well on his printer as they do on mine.
If you want to see a video that give more information on all the trays and some of the design considerations that went into this insert, you can watch that here. But there is no need to watch the video if you just want to know how to layer the trays in the box. You can see how to do that from the pictures in this listing.
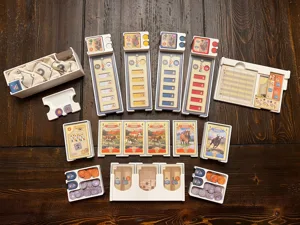
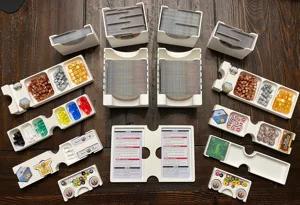
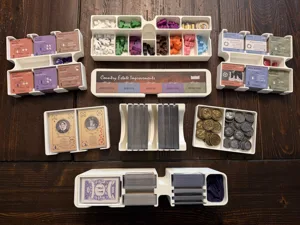
There is a set of setup trays that can remain in the box after setup, and a set of in-game trays that you place on the table.
Setup Trays
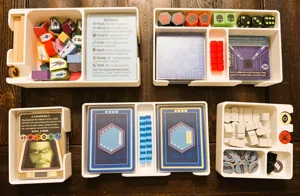
• Three bot trays with custom-shaped openings that hold the Brassmags, bot chips, and any related bot dice. The bots are organized alphabetically, but as shown in the photos, the sides of the trays are cut low enough that you can read the bot names on the chips. The following bots are in each tray (from left to right):
• Bot Tray 1: Access, Bit, Byte, Casing, Cathode, Crash, and Exe
• Bot Tray 2: Firewall, Gyro, Interface, Lithium, Memory, and Nano
• Bot Tray 3: Packet, Processor, Servo, Subroutine, Torrent, and Transmitter
• A captain tray that holds all the captain Brassmags with their corresponding chips. These are also in alphabetical order. Starting from the lower left, the captains are:
• Row 1: Brigade (with all Phalanx chips), Chrak (with a hole for inserting his spear to be held under his Brassmag), Crucible, and Fauxbia
• Row 2: Grimms, iBoss, and Latticewerk
• Row 3: Leer, Stamp, Tendril, and Zuk
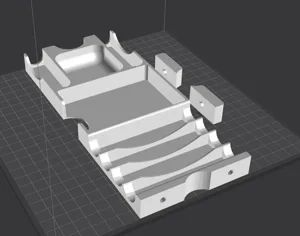
• A room tile “cabinet” with four drawers that slide out and lock in place when closed. The room tiles are never stacked more than four deep in any drawer, making it much easier to find the rooms you are looking for during setup. A big thanks to Hextra for suggesting a critical solution for ensuring that the locks work smoothly but are not too tight. There is still a fairly tight tolerance on the locking mechanism for the drawers, so if you have issues with the locking versions, I have also posted versions without the locking mechanism. Choose which one you prefer.
• Two large card holders. One holds the missions separated by corporation, with an extra slot for the adaptive missions. The second card holder is for the bots, captain, and reference cards. I bought four sets of reference cards, and I designed the tray so they all fit. You can also fit the original smaller reference cards in there, too.
• A network/corporation setup tray that holds the CEO chips, CEO network level die, CEO ping markers, the four player network level dice, and the three red beads for tracking threat and the burncycle.
• Separate player trays for the tracking pegs in each player color. There is one tray for each player color, but I prefer to keep my preferred player color pegs in one of the in-game trays (discussed below).
• A bag tray that can hold the premium bag and the regular bag.
• Two rings to hold the network and floorplan mats in a single roll. These are marked with “L” and “R” labels to identify which goes on the left side and which goes on the right. If you orient them with those labels pointing upward, as shown in the photos, you’ll be in good shape. The left ring angles downward to accommodate the user manuals and the large room tiles. The right ring has a cutout that holds the corporation cards in place.
In-Game Trays
• A tray that holds the command module’s blue tracker pegs, the green open door pegs, the blue and clear beads for tracking objectives and surveillance status of rooms, the surveillance dice, the burncycle die, the ping die, and one set of player tracker pegs. If you are a solo player, you can just get out this tray and won’t need to dig into the separate player peg tray. Just choose your favorite player color and store the pegs in this one tray.
• Two trays that each hold a set of action dice. If you only own one set, the other tray will mainly serve as a spacer to keep everything tidy if you store the game vertically.
• A tray with custom-shaped slots to hold the Brassmag guards for easy access during the game.
• A chip tray to hold the all the chips you use during the game, other than the bot and captain chips, which are in the setup trays above. I designed this tray so each chip type is directly accessible from either the front or the back of the tray. No need to sift through rows of chips to get what you need. The only exception is the first player chip, which is in the middle of a row. But you only need to get that one out during setup.
• An equipment dice tray where you can sort the equipment dice by number.
• A small card tray that holds the equipment, mod, imperative, and keypad cards. It also holds the red keypad die next to the keypad cards (hopefully alleviating confusion between it and the similar-looking red ping die).
• A network and terminal card tray. This tray has a slot at the rear that can hold upright your captain and/or mission card.
• A discard tray for holding your discarded small cards, network cards, and terminal cards. This tray also has a slot for holding upright your captain and/or mission cards. This is an optional tray that was mainly to be used as a spacer to keep things orderly if you store the box vertically, but I wanted to give it an additional purpose in case you want to use it for discards during the game.
Final Notes
The last several images are in sequence to show how to layer everything in the box, as well as providing closer images of some of the trays. To achieve the insert as shown, print the quantities shown in the file names (e.g., print 4 of the player peg trays that have “x4” in their name) and one of everything that doesn’t list a quantity.
You can also choose between room tile drawers that lock or omit the locks. You might try one of the locking drawers to see how it works for you before printing the other drawers. That way you will know if the tolerances on your printer match mine.
Everything prints without supports and fits on a Prusa MK3S+ (250 x 210 x 210 print volume). I printed the trays in the photos with PLA, 15% infill, with a 0.2 mm layer height. You could go higher on the layer height for nearly all the trays, but at least for the room drawer cabinet, I suggest sticking with 0.2 mm to ensure a good function for the drawer locks.
This is a large box that is very heavy when fully loaded. I had to make the trays quite robust to ensure they would handle the weight, so this insert takes over 2 kg of filament using the print settings noted above.
I have included the original OpenSCAD files in case anyone wants to improve on the design for non-commercial purposes.
This is an insert/organizer for burncycle , all of its released expansions (as of December 2023), and the Brassmags Volumes 1 and 2. It all fits in the core box, has no lid lift, supports vertical storage, and was designed to aid setup and teardown. In my Printables listing, you can download the 3D print files and see many more photos, including how to layer everything in the box. For now, here are images of some of the trays.

/pic7482680.jpg)
/pic8995222.jpg)
/pic8995178.jpg)
/pic8995221.jpg)
/pic8995220.jpg)
/pic8995216.jpg)
More by js500